Create AWS EC2 Instance :-
Using AWS as hosting is great choice. To use AWS hosting we need to first create EC2 instance. Follow below steps to create AWS EC2 instance with Ubuntu Server.
Login to your AWS Account:-
-
Login to your AWS account here https://aws.amazon.com/
- Goto EC2 under Services Menu. Click on Launch Instance.
- Choose AMI provided by AWS. For Ubuntu select Ubuntu Server 16.04 64-bit
- Select Instance Type. If you want to choose free tier then it will be selected by default (t2.micro).
- Click next to Configure Instance Details. For general usage keep all the default configurations.
- Click next to add Storage. Default storage is 8GB. If your application needs more space then you can select different size like 16GB etc.
- Click next to add tags. If you like to give key value pair as a tag then you can add that(e.g. key = Name and value = Webserver). This is also optional.
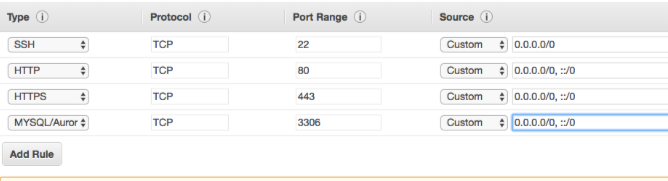
- Click next to add Security Group. By default its allowed to connect server using SSH so TCP 22 Port will be open. To allow web access we will have to allow few more ports. So Add Rule for HTTP, HTTPS, MySQL like below image. For now I have considered open for all the IP address but for security purpose you can specify particular IP address for MySQL rule.
- Click on Review and Launch. Next click on Launch.
- Create a new Key Pair. Give name of key and download it. Keep that PEM file in safe location which will be required to connect to server through SSH access.
- Click on Launch Instance. That’s it. Instance is created.
Installing Apache, PHP, MySQL, phpMyAdmin :-
After creating EC2 Instance you will need to install web server like Apache, PHP etc. To Install Apache, PHP, MySQL, phpMyAdmin on AWS EC2 Instance click here to get step by step guidance.