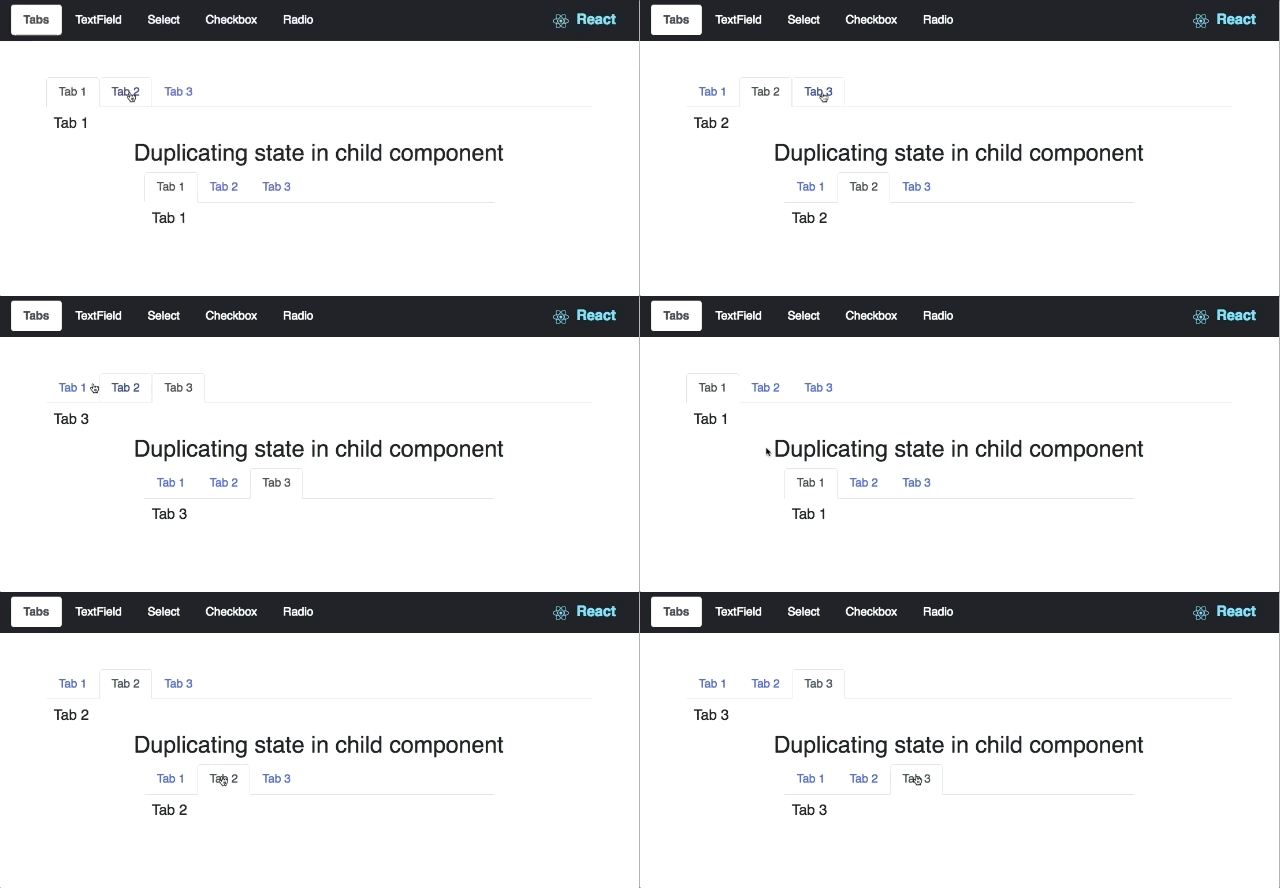
What we will get at the end of this blog reading?
Below you will learn how to use Redux in React JS in easiest way. We have also created easiest demo to learn redux in reactjs with sample application so it will be easier to understand for React JS developers.

As above image we can see in UI, Tab Change in parent effects at the same time in child component also. To do this manually, it would be real headache. But here REDUX comes to help us and that’s where React JS shines most.
Normally when we are trying to learn Redux first time, we just need something so simple which effect UI and we can see it in action easily, that’s the reason which inspired me to write down this blog. I hope you will find it easiest demo to learn Redux in React JS.
So just enjoy the reading and don’t forget to comment or like. Let’s dive into code now.
Let’s understand how Redux works in React JS
Redux is javascript library which is used to store application state with React JS and react native.
It’s mainly divided into three parts.
1) Action
> Actions : Actions are kind of payloads which sends data from your application to your store. You can dispatch action by two way
a) store.dispatch()
b) this.props.action()
> Actions are javascript object that must have type property that specifies type of the property.
2) Reducer
> They are the functions which manipulate current state and returns newly mutated state.
3) Store
> It is like source of truth, or we can say client-side database.
Pros and Cons of React Redux
Pros:
1) Easy to start writing (if you can get over the syntax).
2) Total separation of data and presentation.
3) Never think about re-rendering!
4) DOM binding isn’t our concern.
Cons:
1) React isn’t a framework, it is library.
2) Community conventions are still developing.
3) Build tools are necessary (or strongly encouraged).
Redux Configuration
Here I am assuming we have created fresh react app with npx create-react-app my-app
You can install react-redux with this link
> Now our Index file will looks like below
import { Provider } from 'react-redux';
import { store } from './reducers';

ReactDOM.render(
    <Provider store={store}>
        <BrowserRouter>
            <App />
        </BrowserRouter>
    </Provider>,
    document.getElementById('root')
);
registerServiceWorker();
store=”{store}” This is main line we need to consider here.
> Now we need to create two files :
1) action/index.js
In actions/index.js, We have added function called tabClicked. It will load payloads which is passed from action is dispatched. Here, we must need to pass type property.
export const tabClicked = (activeTab) => ({
    type: 'tabClicked',
    activeTab: activeTab
});
2) reducers/index.js
In reducers/index.js, we can define initial state, we can change current state and returns newly mutated state.
import { combineReducers, createStore } from 'redux';

const initialState = {
    activeTab: 1
}

// reducers.js
export const actionReducer = (state = initialState, action) => {
    switch (action.type) {
        case 'tabClicked':
            return {
                ...state,
                activeTab: action.activeTab
            }
        default:
            return state;
    }
};


export const reducers = combineReducers({
    actionReducer
});


// store.js
export const store = createStore(reducers);
And that is for setup of redux for tab clicked UI state.
How to use Redux in component
import React, { Component } from 'react';
import { connect } from 'react-redux';
import { tabClicked } from './../../actions';

class TabComponent extends Component {

    render() {
        return (
            <div>
                <nav className="col-md-12">
                    <div className="nav nav-tabs" id="nav-tab"
                        role="tablist">
                        <a className={"nav-item nav-link"
                              + (this.props.activeTab === 1
                              ? ' active' : '')} id="nav-tab1-tab"
                              data-toggle="tab" href="#nav-tab1"
                              role="tab" aria-controls="nav-tab1"
                              aria-selected="true"
                              onClick={() => this.props.tabClicked(1)}>
                              Tab 1
                        </a>
                        <a className={"nav-item nav-link"
                          + (this.props.activeTab === 2
                          ? ' active' : '')}
                          id="nav-tab2-tab" data-toggle="tab"
                          href="#nav-tab2" role="tab"
                          aria-controls="nav-tab2"
                          aria-selected="false"
                          onClick={() => this.props.tabClicked(2)}>
                          Tab 2
                        </a>
                        <a className={"nav-item nav-link"
                          + (this.props.activeTab === 3
                          ? ' active' : '')}
                          id="nav-tab3-tab" data-toggle="tab"
                          href="#nav-tab3" role="tab"
                          aria-controls="nav-tab3"
                          aria-selected="false"
                          onClick={() => this.props.tabClicked(3)}>
                          Tab 3
                        </a>
                    </div>
                </nav>
                <div className="tab-content col-md-12"
                    id="nav-tabContent">
                    <div className={"tab-pane fade"
                          + (this.props.activeTab === 1
                          ? ' show active' : '')} id="nav-tab1"
                          role="tabpanel"
                          aria-labelledby="nav-tab1-tab">
                        <h5>
                            Tab 1
                        </h5>
                    </div>
                    <div className={"tab-pane fade"
                          + (this.props.activeTab === 2
                          ? ' show active' : '')} id="nav-tab2"
                          role="tabpanel"
                          aria-labelledby="nav-tab2-tab">
                        <h5>
                            Tab 2
                        </h5>
                    </div>
                    <div  className={"tab-pane fade"
                          + (this.props.activeTab === 3
                          ? ' show active' : '')} id="nav-tab2"
                          role="tabpanel"
                          aria-labelledby="nav-tab3-tab">
                        <h5>
                            Tab 3
                        </h5>
                    </div>
                </div>
            </div>
        );
    }
}

function mapStateToProps(state) {
    return {
        activeTab: state.actionReducer.activeTab,
    }
}

const mapDispatchToProps = {
    tabClicked
};

const TabContainer = connect(
    mapStateToProps,
    mapDispatchToProps
)(TabComponent);

export default TabContainer;
We need to bind mapStatetoProps and mapDispatchToProps with current component. You can see parts in bold which are important for Redux.
We can use props and event in HTML as well.
<a className={"nav-item nav-link" + (this.props.activeTab === 1
   ? ' active' : '')} onClick={() => this.props.tabClicked(1)}>Tab 1</a>
Same code we need to use in duplicate-tab component, that way same state will be used in two components and we can see magical effect of redux.
GitHub link is ready for you to download and check it.
Also we have Stackblitz
Feel free to comment below your thoughts or if you have any questions.


