Before starting with video analysis tool with canvas drawing let’s look fabric.js and video.js libraries.
Fabric.js
Fabric is a javascript library for canvas drawing. Fabric is used for a missing object model for canvas, as well as an SVG parser, layer of interactivity, and a whole suite of other indispensable tools for canvas.
Why Fabric.js?
Canvas allows us to create some completely stunning designs on the web nowadays. But the API it provides is disappointingly low-level. It’s one thing if we basically need to draw a couple of fundamental shapes on canvas and forget about them. But as soon as there’s a need for any kind of interaction, change of picture at any point, or drawing of more complex shapes — situation changes dramatically.
Fabric aims to solve this problem.
Fabric provides powerful object model on top of native methods. It can maintain canvas state and rendering, and lets us work with “objects” directly.
Video js
Video.js is a javascript library used for web video player for an HTML5 world. It supports HTML5, Flash video and also supports YouTube and Vimeo (through plugins). It supports video playback on computer and mobile devices.
Video Analysis Tool
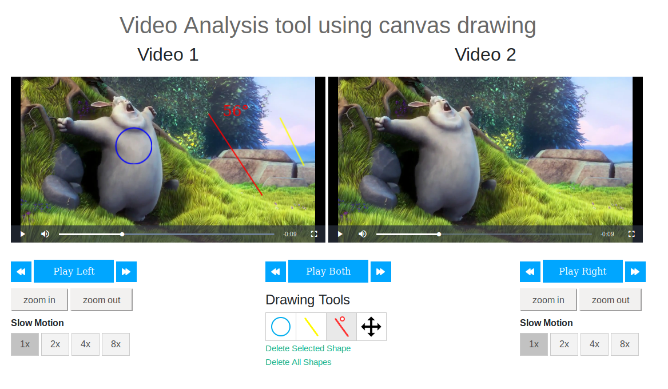
Video analysis tool is used for compare videos, suppose we have subscribed to online learning any sports from videos. From instructor’s videos we are learning and practicing. Now if we want to compare my practice shots with instructor’s video we can use this tool.
From this tool, we can play both videos and compare them. We can draw lines, angles, and circles for comparison. We have other options like zooming, forward, backward, slow motion, etc.
Using this video analysis tool we can compare two videos and perform drawing operations like Lines, Circle and Angle.
Let’s start discussion for canvas drawings.
Create two canvas objects for drawing shapes:
var canvas = new fabric.Canvas("video-canvas", {selection: false});

var canvas1 = new fabric.Canvas("video-canvas1", {selection: false};
1. Line
Once select line from drawing tools, use mouse to draw line on videos.
To draw dynamic lines, we need to handle mouse down, mouse up and mouse move events to draw line.
Here is sample code for drawLine()
function drawLine() {
    canvas.on('mouse:down', function (o) {
        if (isLineDrawing == "1") {
            canvas.selection = false;
            isDown = true;
            var pointer = canvas.getPointer(o.e);
            var points = [pointer.x, pointer.y, pointer.x, pointer.y];

            line = new fabric.Line(points, {
                strokeWidth: 2,
                fill: 'yellow',
                stroke: 'yellow',
                originX: 'center',
                originY: 'center'
            });
            canvas.add(line);
        }
    });

    canvas.on('mouse:move', function (o) {
        if (!isDown)
            return;
        if (isLineDrawing == "1") {
            var pointer = canvas.getPointer(o.e);
            line.set({x2: pointer.x, y2: pointer.y});
            canvas.renderAll();
        }
    });

    canvas.on('mouse:up', function (o) {
        isDown = false;
    });
}
From the above sample code, we can see that in mouse down event we create a new line on the canvas and when we move the cursor, we are updating line endpoint so it will draw a dynamic line on a canvas object.
2. Circle
Once we select a circle from drawing tools, click and draw a circle on the canvas.
Same like lines, we are using mouse down, mouse moves and mouse up events for drawing a circle.
Here is sample code for drawCircle()
function drawCircle() {
    canvas.on('mouse:down', function (o) {
        if (isCircleDrawing == "1") {
            isDown = true;
            canvas.selection = false;
            var pointer = canvas.getPointer(o.e);
            origX = pointer.x;
            origY = pointer.y;
            circle = new fabric.Circle({
                left: origX,
                top: origY,
                originX: 'left',
                originY: 'top',
                radius: pointer.x - origX,
                angle: 0,
                fill: '',
                stroke: 'blue',
                strokeWidth: 2,
            });
            canvas.add(circle);
        }
    });

    canvas.on('mouse:move', function (o) {
        if (isCircleDrawing == "1") {
            if (!isDown)
                return;
            var pointer = canvas.getPointer(o.e);

            var radius = Math.max(Math.abs(origY - pointer.y), Math.abs(origX - pointer.x)) / 2;
            if (radius > circle.strokeWidth) {
                radius -= circle.strokeWidth / 2;
            }
            circle.set({radius: radius});

            if (origX > pointer.x) {
                circle.set({originX: 'right'});
            } else {
                circle.set({originX: 'left'});
            }
            if (origY > pointer.y) {
                circle.set({originY: 'bottom'});
            } else {
                circle.set({originY: 'top'});
            }
            canvas.renderAll();
        }
    });

    canvas.on('mouse:up', function (o) {
        isDown = false;
    });
}
From the above sample code, we can see that in mouse down event we create a circle and while moving mouse we are updating the radius of this circle.
3. Angle
The angle is not available in canvas or fabric. It is a custom tool for getting an angle of drawing lines. It shows an angle of start and end point of the line.
Once we select the angle and draw a line on the canvas and just finish line it will calculate the angle of that line.
Same like other tools for angle we handle same events like mouse down, mouse move and mouse up.
Here is sample code for calculating the angle of the drawn line.
function drawAngle() {
    canvas.on('mouse:down', function (o) {
        if (isAngleDrawing == "1") {
            canvas.selection = false;
            isDownAngle = true;
            var pointer = canvas.getPointer(o.e);
            var points = [pointer.x, pointer.y, pointer.x, pointer.y];

            line = new fabric.Line(points, {
                strokeWidth: 2,
                fill: 'red',
                stroke: 'red',
                originX: 'center',
                originY: 'center'
            });
            line.line1 = line;
            canvas.add(line);
        }
    });

    canvas.on('mouse:move', function (o) {
        if (!isDownAngle)
            return;
        if (isAngleDrawing == "1") {
            var pointer = canvas.getPointer(o.e);
            line.set({x2: pointer.x, y2: pointer.y});
            canvas.renderAll();
        }
    });

    canvas.on('mouse:up', function (o) {
        if (isAngleDrawing == "1") {
            y11 = line.get('y1');
            y12 = line.get('y2');
            x11 = line.get('x1');
            x12 = line.get('x2');
            var dy = y12 - y11;
            var dx = x12 - x11;
            var theta = Math.atan2(dy, dx); // range (-PI, PI]
            theta *= 180 / Math.PI;
            line.startAngle = theta;
            var angle = countAngle(theta);
            var angl = parseInt(angle).toString() +'°';
            var top = line.top
            var left = line.left;
            if((theta >45 && theta < 75) || (theta >-180 && theta < -165)){
                left += 11;
            }
            if((theta >76 && theta < 90) || (theta >-166 && theta < -145)){
                left += 08;
            }
            if((theta >0 && theta < 46) || (theta >-146 && theta < -90)){
                left += 20;
            }
            var text1 = new fabric.Text(angl, {
                fontSize: 25,
                fontFamily: 'Georgia', top: top, left:left,
                fill: 'red'
            });
            line.lineText = text1;
            canvas.add(text1);
            isDownAngle = false;
            rotateText(line);
        }
    });
    canvas.on('object:rotating', function (e) {
        if(typeof e.target.lineText != "undefined"){
            var newAngle = getCurrentAngle(e);
            var theta = countAngle(newAngle);
            theta = parseInt(theta).toString() +'°';
            e.target.lineText.setText(theta);
            rotateText(e.target);
        }
    });
}

function countAngle(theta){
    if (theta < 0.0) {
        theta += 360.0;
    }
    if (theta > 90 && theta <= 180) {
        theta = 180 - theta;
    }
    else if (theta > 180 && theta <= 270) {
         theta = theta - 180;
    }
    else if (theta > 270 && theta <= 360) {
       theta = 360 - theta;
    }
    else if (theta > 360) {
       theta = theta - 360;
    }
    return theta;
}
From the above calculating angle, we can see that we have mouse down and mouse moves events. It will draw a line on the canvas.
When line drawing completed we handle mouse up event to get start and end coordinates of the line.
From these coordinates, we have to calculate the angle. Here is angle calculation sample code,
Get coordinates of lines
	y11 = line.get('y1');
        y12 = line.get('y2');
        x11 = line.get('x1');
        x12 = line.get('x2');

Calculation of Angle
        var dy = y12 - y11;
        var dx = x12 - x11;
        var theta = Math.atan2(dy, dx);
        theta *= 180 / Math.PI;
        var angle = countAngle(theta);

Video tools and how we can use it?
First we have to create video object so we can access all the properties of it.
var player = videojs(“sidebyside-video_1”).ready(function() {} );
1. Play Video
We can play video by play() method of video js.
player.play();
2. Pause Video
For pause video pause() method is used.
player.pause();
3. Zoom
For zoom in and zoom out we are updating video zoom value, increase or decrease 0.5 in zoom value.
To update zoom value we have to use zoomrotate() method.
player.zoomrotate({ zoom: 1.5});
For slow motion we are using playbackRate() method. We have four options in our tool which has different values like, 1X = 1, 2X = 0.5, 4X = 0.25, 8X = 0.125.
player.playbackRate(0.5);
5. Forward-backward
To forward we are increasing 5 seconds on the current time and for backward decrease 5 seconds on the current time.
player.currentTime(5);
Conclusion
So now we can say that by using this drawing option and video options you can implement video analysis tool on the project.
Here we have used some common drawing tools but you can use any shapes based on project requirements. We tried to make video comparison and analysis simple and developer can modify options based on project requirements.
You can clone this repository from GitHub
You can read more interesting articles here. Thank you for reading


