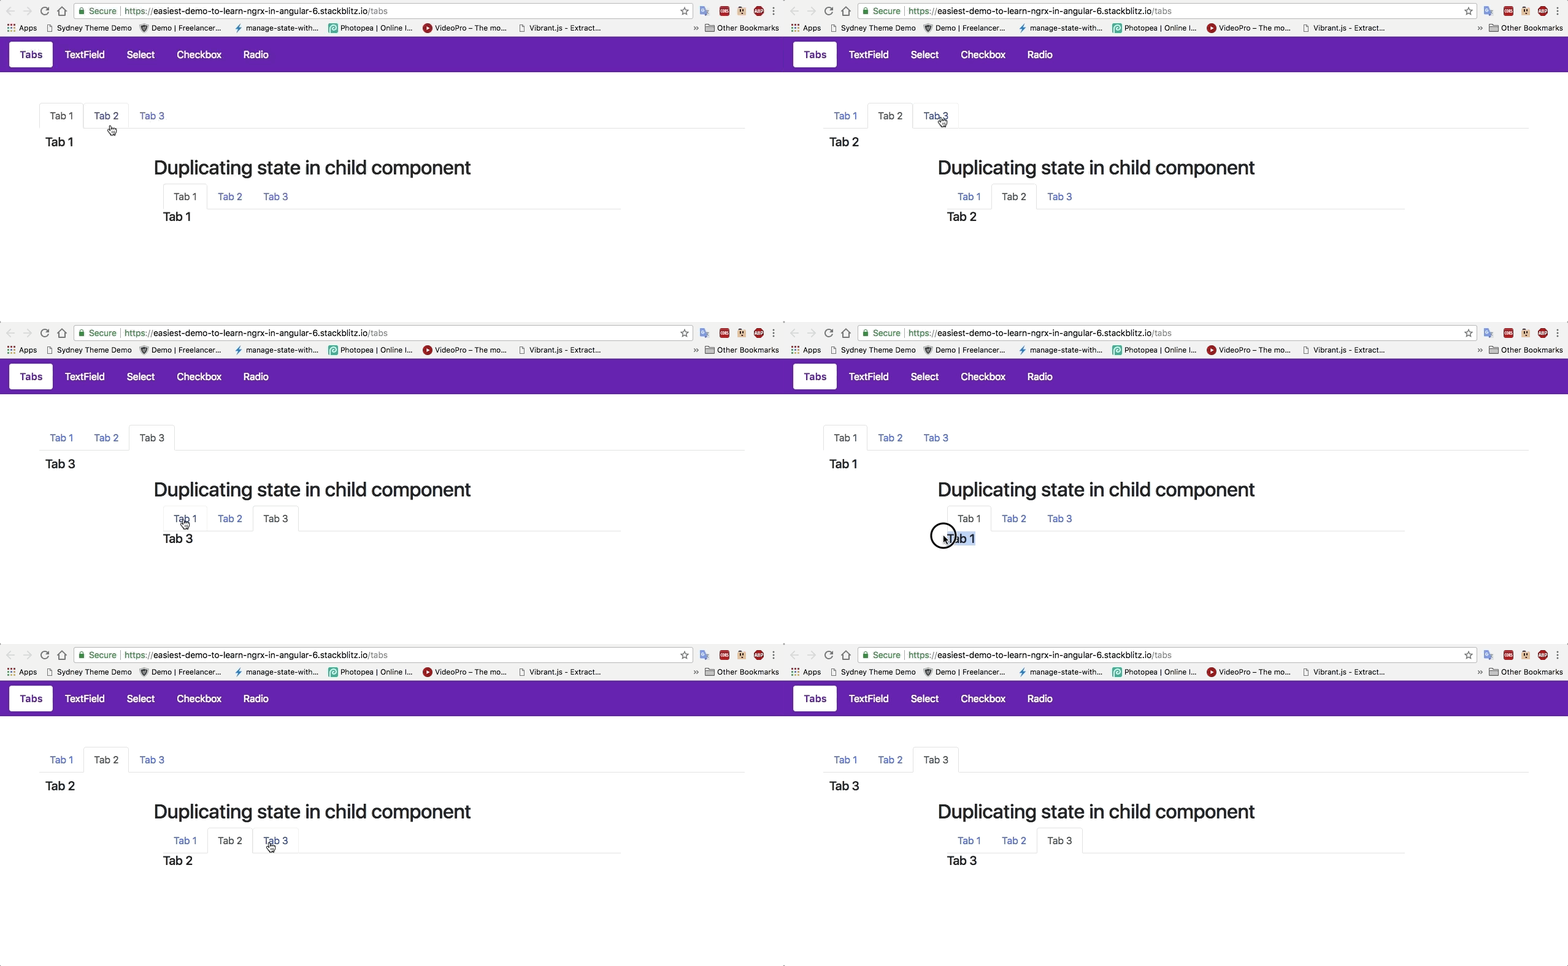
What you gonna learn about NgRx after reading this?
At the end of this tutorial, you will get this type of app with UI state management (where you change the tab and it will do the samething in child component and vice versa. And it will intact even if you route to other pages). To do this manually it will take lots of logic but with NgRx it will be really easy and unbreakable. Learn NgRx in easy way!

So let’s understand Little about NgRx
NgRx/store is state management library for the Angular application which is powered and inspired by RxJs (Redux).
It’s divided into this four parts…
- Action
- Reducer
- Effects
- Store
- Action: User clicks on something or changes some values in the text field we dispatch new Action (for ex. TextFieldChangedAction) which alters our store.
- Reducer: They are the functions which manipulate current state and returns newly mutated state.
- Effects: We can also call it Middleware, usually its used for getting data from APIs (like map and subscribe we use it regularly in angular 7).
- Store: It is like Source of truth, or we can say client-side database.
Let’s see pros and cons of NgRx
Pros
> Behave consistently, manages states in UI.
> Don’t have to call API for same data every time.
> Debugging is easy with its own debug tool(@ngrx/store-devtools)
> Experience of new coding Terminology.
Cons
> Makes code more Complex.
> Adds limitations(have to create and call actions every time).
> A user must have knowledge of Redux core concepts.
> it takes to long to create Boiler Plate.
NgRx/store configuration
You can install @ngrx/store with this link.
Also, I also recommended you to install its dev tools with this link. you also have to install chrome extenstion to see it in action.
now our app.module.ts should look like this:
imports: [
    BrowserModule,
    AppRoutingModule,
    ReactiveFormsModule,
    FormsModule,
    // Here is configuration for set up of store module
    StoreModule.forRoot(reducers),
    StoreDevtoolsModule.instrument(),
  ],
  providers: [],
  bootstrap: [AppComponent]
After that we will create folder named store and in this folder we will create two files
1. app.state.ts
2. app.reducer.ts.
In app.state.ts and in app.reducer.ts we added a member named ui (which is type of UIState).
app.state.ts
import { UIState } from './UI/ui.state';

export interface AppState {
   ui: UIState;
}
app.reducer.ts
import { UIState } from './UI/ui.state';

export interface AppState {
   ui: UIState;
}
We also need to create these three files
1. ui.state.ts > this is our interface file where we declare types and parameters.
2. ui.actions.ts > for do users actions like TextFieldChangedAction, TabChangedAction, SelectChangedAction.
3. ui.reducer.ts > which assigns new mutated state to our store object, where we also declare default values of states object.
ui.state.ts
export interface UIState {
    selectedTab: string;
}
ui.actions.ts
import { Action } from '@ngrx/store';

export const UIActionsTypes = {
    TAB_CHANGED_ACTION: '[UI] -Tab changed-',
};

export class TabChangedAction implements Action {
    type = UIActionsTypes.TAB_CHANGED_ACTION;
    constructor(public payload: any) { }
}
ui.reducer.ts
import { UIState } from './ui.state';
import { UIActions, UIActionsTypes } from './ui.actions';

export const appInitialState: UIState = {
     selectedTab: 'nav-tab1-tab',
};

export function uiReducer(state = appInitialState, action: UIActions): UIState {

    switch (action.type) {

        case UIActionsTypes.TAB_CHANGED_ACTION: {
            return Object.assign(state, {
                ...state,
                selectedTab: action.payload
            });
        }
    }
}
As you can see we have also added TAB_CHANGED_ACTION in actions, which should be called on every click done by user.
How to use in component
constructor(private store: Store) {
    this.selectedTab = this.store.select(state => state.ui.selectedTab);
}

onChangeTab(event) {
    this.store.dispatch(new TabChangedAction(event));
}
We also need to check selectedTab part that how its attached to html, I will just show selectedTab | async part, with async pipe it automatically listens changes in state.
<a class="nav-item nav-link" [class.active]="(selectedTab | async) === 'nav-tab1-tab'" id="nav-tab1-tab" data-toggle="tab" href="#nav-tab1" role="tab" aria-controls="nav-tab1" aria-selected="true" (click)="onChangeTab('nav-tab1-tab')"$gt;Tab 1</a$gt;
Same observer we need to use in duplicate-tab controller, that way same state will be used in two controllers and we can see magical effect of NgRx.
GitHub link is ready for you to download and check it.
Also we have Stackblitz
Feel free to comment below your thoughts or if you have any questions.


